Yer boss, dese weapons are the best wunz ever. Da Boyz will hit better, an ‘arder than ever before! – Gorsmak
It should be known that I’m strictly a casual Warhammer player. My introduction was via my second kid, who found an older Space Marine tank kit in the dusty back shelves of our old FLGS. From there, his armies (and painting skills) flourished. Our family skirmishes started as 1v1v1v1 battles across a table littered with board game boxes for terrain. What you might call the king-of-the-hill variety. Not strictly (or remotely) tournament polished, but genuinely hilarious and enough to get the rest of us interested in building our own collections.
I started out painting terrain for the table. Ivy covered brick walls, thatched roof cottages, stone and skull piles, the like. I finally decided on Orks largely because I liked the flavor—particularly the idea that belief (like ‘red makes things go faster’) could be powerful enough to make it so.
I bought boxed army. These were the first models of any type I’d gotten that were in parts, and then there were DOZENS of them. Background: I didn’t follow lego building set guides as a kid and I still toss the instructions from IKEA furniture. Kid 2 generously primed and assembled most for me as I muddled through figuring out how to put them together myself.
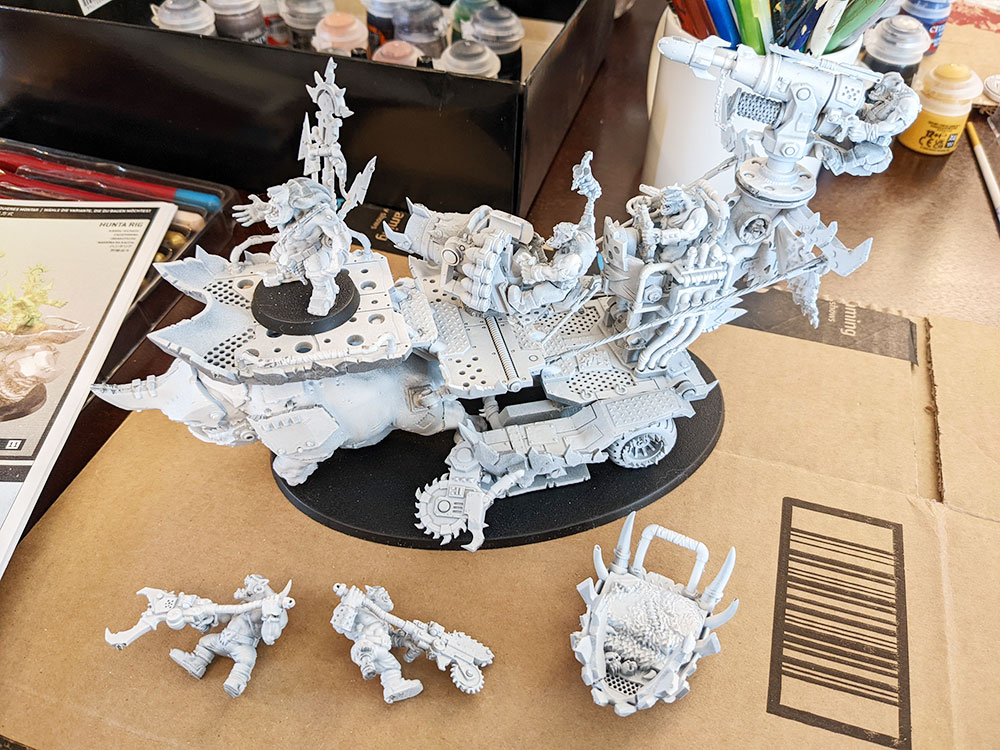
Fast forward not that far into the future. The Hangry Horde of Ork Boys is maintaining its place in the family table ranking, but I’m lacking a big gun. Something obnoxious. Something ridiculous. Something stupidly stupendous. Enter: The Kill Rig.
Maybe you’ve rented a hot car then realized as you slid into the driver’s seat that it was manual, and you never learned to drive stick. Or perhaps you’ve promised to bake for the office and remembered you don’t know how to turn on your oven. You can imagine the change of expression as I gleefully opened the box and pulled out three completely full sprues of parts (almost 100 pieces) for ONE machine and boys, and an instruction manual that rivals in size many of the world’s major holy texts. Phrick.
Assembly
There are two schools of thought on assembly/painting. Some prime, assemble, then paint. Some prime, paint, then assemble. I’m of the first category: partially because my background is painting full canvases, partially because my eyes have been kicking around since 1975 and painting something that’s smaller than a pop rock is libel to cause me to see double the rest of the day.
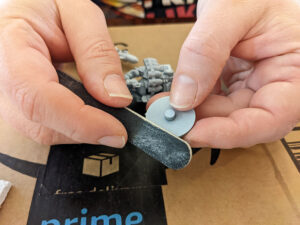 The sprues were a little intimidating, but the manual led me to the first two pieces to assemble. Easy enough, right? It didn’t take long to get into a rhythm, carefully snipping off a tiny piece, filing the leftover connector bits, slotting it into place to check for fit, then dotting an end with glue and mashing the two together. My biggest trouble was a fight with impatience—waiting while two bits were ACTUALLY secure and not ‘secure enough to look secure then you try and mash another bit on and it all comes apart’ secure.
A couple of dozen pieces in I hit my first snag—the connection point between the high back tower and the middle platform would NOT meet. At all. I re-consulted the book, I checked every connection—nothing. Finally, I turned to the experts—the kids. “Yeah, it’s just not pictured right—clearly it goes back here.” Sure enough, the connectors were exactly where he indicated, NOT where the manual pointed. OK.
 Five more pieces in I hit another snag. I spent about ten minutes looking for a piece that did not exist—or at least did not exist as the number they had it labeled as. This happened a few more times over the course of the build. Fortunately, the pieces are also pictured so I was able to suss out which I needed, but somewhat frustrating when you’re dealing with this number of pieces, some of which are similar enough to need a minute inspection to determine which they are (“Is this a raised arm ork with an axe and a mohawk or a raised arm ork with an axe and an eyepiece?”) I asked the kids what they’d do. “I just clip everything, bung it into a bowl, and assemble from there.” Clearly, I am not playing on hard mode.
Those exceptions aside and despite how daunting this model was at the start, most of the build went well. GW does a nice job of creating little tabs and grooves to assist in lining things up, and for the most part, the manual was a good general guideline to what order things should go together.
Paint
Tons of itty bitty details, funny expressions, and lots of opportunity for expression—I couldn’t wait to paint this beast. I’m fortunate to have access to an array of model paints but I’ll mention that there is a little bit of a learning curve with these as well. There are paints designed for airbrushing, for washes, for shading, for over and under coatings, most marked with a keyword written above their color: ‘Air Balthasar Gold’, ‘Shade Nuln Oil’ etc. Fortunately, you can generally tell the difference by the consistency, but I imagine this might be somewhat confusing for someone standing in front of the citadel paint display of their FLGS.
 I chose to go mildly steampunk-y, with a few brighter colors to reflect the Ork beliefs, in that particular yellow means explosions and blue is lucky. About halfway in I realized I was going to use half a container of steel colored. Just a little after that I realized why some people paint first.
When you’re doing a smaller model assemble then paint works fine largely because you have access to every little bit of the model. When you have a hulking behemoth with lots of nooks and crannies you’ll find out just how creatively you can bend you hand and fingers to get a paintbrush around four other bits to reach that one tiny spot that almost inaccessible but (of course) entirely visible. Much like Bruno, we don’t talk about my driver’s pants.
I also chose to shade it to add detail. It’s a relatively simple process that adds a ton of pop by painting over the model with a very thin oil with pigment in it that will intentionally pool in cracks and crevasses. I CANNOT recommend shading high enough; this will pull all the detail out and make up for a variety of sins (like, entirely hypothetically, painting 4/5 the model in one steel color, getting distracted, then doing the rest in a different hue. Hypothetically.) It took a little while to cover everything but was totally worth the finished product. I’d absolutely recommend having fun with paints and not being afraid to try something unique and fun.
Overall
Not for the faint of heart, the Kill Rig (or in my case, the Hunta Rig modification) is impressive on the table. I would definitely recommend having some assembly and painting experience before picking up this model, and be prepared for a few head scratcher moments in the build. That being said, if you want something to make your Boyz go faster, hit harder, and look super sweet while doing it, this kit is for you. ‘Ere We Go, ‘Ere We Go, ‘Ere We Go!








Ok, that’s an exceptionally ambitious project and an exceptionally awesome paint job.
I mostly inhabit the world of Eurostyle games, and I have to concede that your review makes me a little bit jealous of the awesome toys that we don’t have in our games. :>
I mean… GW is an English company and 40k is thus a classic English game.